| Previous step | Current step | Next Step |
Choosing where to add more information into the grammar
In this case, the information to be added is quite simple and was easy to find. An ordering realization statement that places the constituent labelled Title immediately before the constituent labelled Name has to given. More important is exactly where we put this information in our grammar. The idea is to place the information in as general a position as possible (i.e., as far to the left of the network as we can). This means that we capture many generalisations, since the constraint then applies to all the particular structures that we reach by making choices to the right of the constraint in the network. If we place it too far to the left, however, then we might make statements that are not true: for example, that all clauses in English have Finite verbs, or Subjects, etc.
Then again, if we do not place the constraint far enough to the left, then we miss generalisations and will have to repeat information. For example, if we take the realization statement that we need here and place it on the feature male then we will generate the correct form Mr. Smith. The grammar will have said what order the Title and the Name are to come in. But this will not tell the grammar anything about the order of Title and Name for the choice of the feature female. We will, therefore, have lost a generalisation; and that generalisation is that, for English, all Titles come before Names. So we need to put the ordering constraint at the first point where we have decided to have a title at all, i.e., on the feature title in the system called TITLED.
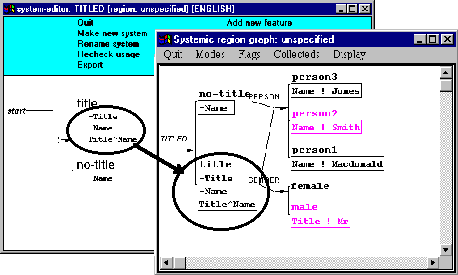
To do this, we need to edit the system TITLED as it is given. We do this by going to the system network graph , and placing the mouse over the name of the system we are interested in, here: TITLED (the first system from the left in the networks shown in earlier steps). Click the left mouse button once. This will bring up a close-up view of just that system in a separate window, which looks as follows.

This window gives us a bit more detailed information about the system and also allows us to change the system, which is what we are interested in here.
To make our grammar get the order of its constituents correct, we want to add a realization statement to the feature title. We therefore move the mouse to this feature (a box should appear around the feature name when the mouse is positioned properly), and click left once. This brings up a menu of editing possibilities thus:
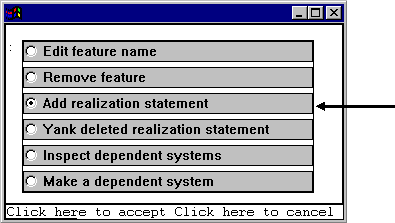
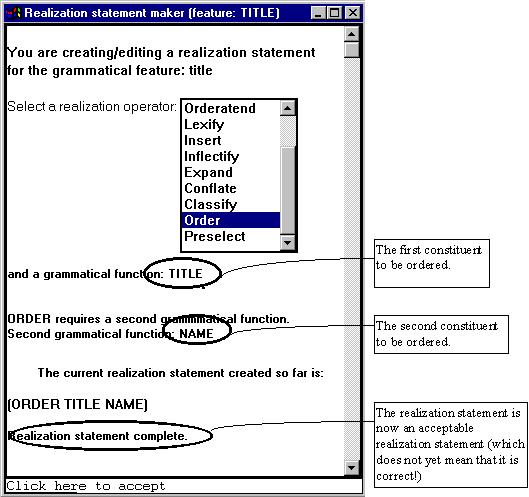
We want to add a realization statement, so we select this option. We will see what some of the other options do below. Selecting to add a realization statement brings up a more complicated menu that allows to build different realization statements.
We have to select the realization statement type (e.g., inserting, ordering, etc.) and to say which grammatical constituents that statement is to apply to (e.g., to the Title or the Name, etc.). The menu tells us when the realization statement is complete.
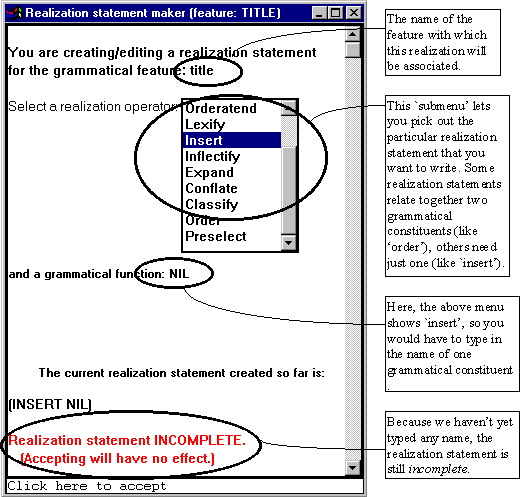
Note that in some variants of the programme, the list of realization operators is given not in the middle as shown above, but at the bottom of the window in a separate menu as shown here:
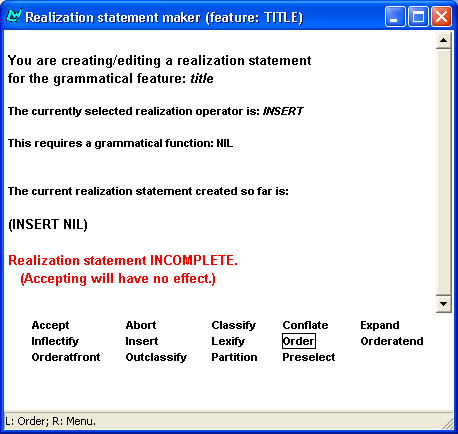
The options are the same though in both cases and they have the same effect
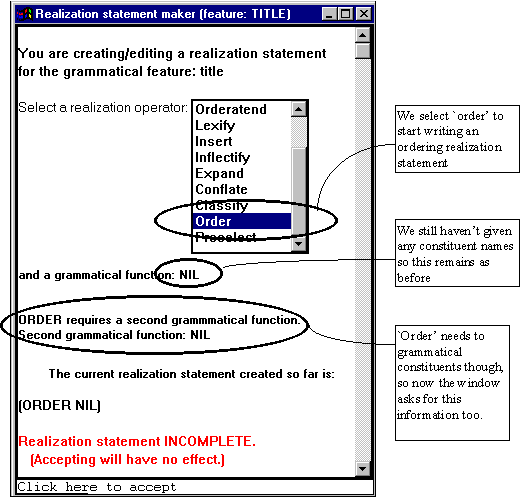
The window now needs us to type in the labels of the two constituents that are to be ordered. We do this by clicking on the places indicated above and marked by NIL, and typing in the names.
Each name should be finished off by typing a return, or enter, so that the program knows that the name is finished. When this has been done for both constituents, the window changes again to indicate the status of the realization statement that you are writing. If you have typed the names in as required, then the window will look as follows, telling you that the realization statement is now complete.
You can now accept the realization statement by clicking in the lower left-hand corner on the 'Accept' option. This causes the realization statement to be added to your system, and the picture of the system in the system editing window changes accordingly.
This window will now look something like the following. Note that the window now also shows you the realization statements of the feature you are looking at in a separate table at the bottom. You can further edit these statements by clicking on them directly. Moving the mouse over them will show you which bits can be clicked on to select them for changes. A right mouse click on any of these realization statements will remove it from the system.

When you are happy that you have changed the system in the way you wanted, you must tell the program that you are finished editing and that the new system should replace the old one. Until now, the changes that you have made in the system are only in the window you have been working with; you have not yet changed the grammar that the program uses to generate sentences. You can use the system editing window as a piece of rough paper for getting the realization statements right.
In order to make the new system replace the old one, you must click on the Export command in the blue menu area (9). Exporting a modified system will then cause the grammar network in your network window to change accordingly. So that window will now change the TITLED system that it was showing to reflect your changes.
If you forget to export the system and just Quit from the system editor window, then the program will warn you that you have made changes which are not yet saved. You then either ignore your changes or go back and export them.